Matcha Gingerbread House
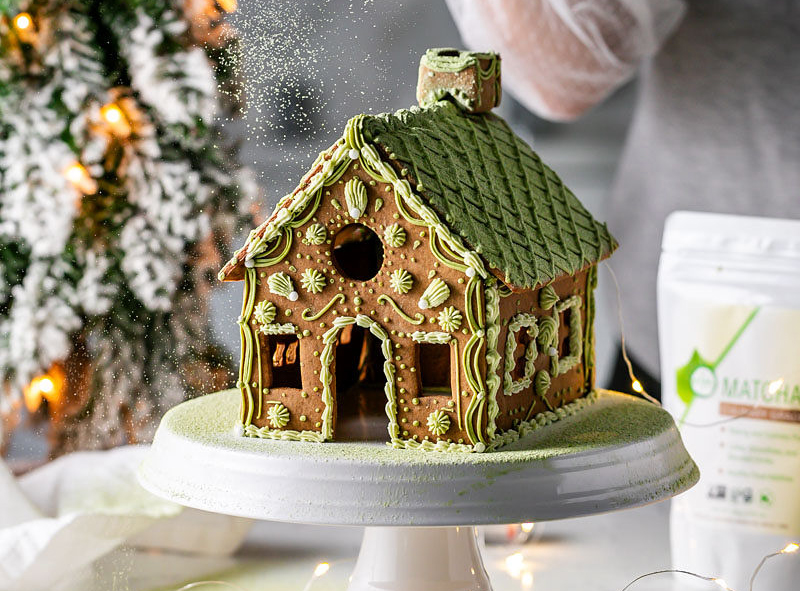
Celebrate the holiday season with a charming Aiya Matcha Gingerbread House, decorated with royal icing infused with rich and flavorful culinary Aiya Matcha powder. In varied shades of green, the matcha gingerbread house would make a stunning centerpiece for your next Christmas gathering and can be taken apart and enjoyed as a delicious treat once the festivities are over!
Matcha Gingerbread House
SERVINGS: 1 Gingerbread House
TIME: 3 hrs
CATEGORY: Desserts
 INGREDIENTS
- Matcha Gingerbread House
- • ¾ cup plant-based butter (or dairy butter)
- • ¾ cup packed dark brown sugar
- • ⅓ cup molasses
- • 1 egg
- • 1 tsp vanilla extract
- • 2½ cups all-purpose flour
- • 1 tsp baking powder
- • ¼ tsp salt
- • 2 tsp Aiya Culinary Matcha Powder
- • 2½ tsp dried ginger
- • 2½ tsp cinnamon
- • ½ tsp clove
- • ¼ tsp nutmeg
- Matcha Royal Icing
- • 3 cups powdered sugar
- • 3 Tbsp meringue powder
- • ¼ cup warm water
- • 1 tsp vanilla
- • Aiya Culinary Matcha Powder
- • Tipless piping bags
- Decorations & Supplies
- • Gingerbread House Cookie Cutter Set
- • Piping bag(s) fitted with various sized star tips – such as 4B, 14 & 32
- • Powdered Sugar and Aiya Culinary Matcha Powder combined
- • White sugar pearls
 DIRECTIONS
- Matcha Gingerbread Cookies
- 1. Mix flour, baking powder, salt, Aiya Culinary Matcha powder, ginger, cinnamon, clove and nutmeg in a bowl until combined and set aside.
- 2. In the bowl of the stand mixer, beat butter and sugar until light and fluffy (about 3 minutes,) then slowly stir in molasses, egg, and vanilla, scraping down the sides and mixing until fully combined.
- 3. Add the flour mixture to the wet mix until fully combined and the dough attaches to the paddle. The mixing bowl will be clean when the dough is ready. If slightly sticky add additional flour 1 Tbsp at a time until dough attaches to paddle.
- 4. Preheat oven to 400°F.
- 5. Roll the dough out onto a parchment lined surface to ¼″ thick.
- 6. Cut gingerbread dough gingerbread house shapes. You should have 6 cut cookies total. 2 front/back wall, 2 sides of house, 2 roof panels.
- 7. Bake for 6 minutes (for large cookies 4-5 minutes for small).
- 8. Transfer to cooling rack to cool fully.
- Matcha Royal Icing (piping consistency)
- 1. Place meringue powder and half of the water in the bowl of an electric mixer.
- 2. Whisk on high for about 2-3 minutes until the meringue mixture gets light and frothy.
- 3. Switch to a paddle attachment and mix in the powdered sugar and vanilla on medium for 2-3 minutes until well combined.
- 4. For the gingerbread house you will only need one consistency of royal icing, for the detail work. It’s a thick piping consistency like the consistency of toothpaste.
- 5. Add ¼ tsp of water at a time until this piping consistency is achieved.
- 6. Divide the piping consistency icing into two bowls.
- 7. Use two tones of Aiya Matcha icing to add dimension to the gingerbread house.
- 8. Two create the 2 tones, mix in 1-2 tsp Aiya Culinary Matcha powder into bowl 1, and ½ tsp Aiya Culinary Matcha powder into bowl 2.
- 9. Mix until combined and desired green colors are achieved.
- 10. Divide the completed icing into 4 piping bags:
- 11. Tipless piping bag (no piping tip): detail work: dots, half circles lines, roof.
- 12. Piping bag fitted with tip 4B: Scalloped piping in the center line of the roof.
- 13. Piping bag fitted with tip 32: piped stars and scallops on front, back and side panels of house.
- 14. Piping bag fitted with tip 14: scalloped design along doors, windows, roof and the bottom edge of the house.
- 15. Seal all bags shut so icing doesn’t dry out.
- 16. You should have 4 bags total. 3 with tips, one without.
- Decorating
- 1. The Matcha gingerbread house is piped with Lambeth/Vintage style piping. This style is completely optional, as the house can be decorated in any design of choice.
- 2. Lay all the cookies flat on a surface for decorating with ease. Allow the icing on the cookies to dry for easy assemble.
- 3. Start by decorating the centerpiece which is the front/back of the house. This is where you’ll add most of the detail work, with the tipless piping bag, from curved piped lines along the edges of the house, and dots around the windows and door.
- 4. Complete the piping with the tipless piping bag on front/back of house panels.
- 5. Then pipe scallops and stars with tips 32 & 14 onto the front/back panels of the house. Use image for reference.
- 6. For additional detail attach sugar pearls to the piped decorations on the front/back of house set aside to dry.
- 7. Once complete, start decorating the side panels.
- 8. Pipe a similar design from the front/back panels onto both sides panels (dots, curved lines) with the tipless piping bag, making sure that both panels match. Then pipe scalloped detail along windows of the side panels. Set aside to dry.
- 9. For the roof panels, pipe long angled lines onto each panel about 1” apart.
- 10. Then cross the lines by piping in the opposite direction to complete the diamond shaped design. Repeat this design for both roof panels.
- 11. Set aside to dry for 30 minutes.
- 12. To assemble: Pipe icing along the bottom and seam edges of front of house panel and attach to surface of choice (cake stand, plate, board.) Next pipe the side panels with icing on the seam and bottom edges.
- 13. Line the side panels with the icing piped on the front of the house and attach.
- 14. Repeat steps for back of house.
- 15. To attach the roof, pipe icing on the angled seams on the front and back of house panels and attach both sides of the roof panels to the front/back of house panels.
- 16. Fill any seams and open spaces with icing.
- 17. Use bag with large star tip (4B) to pipe scalloped icing design down the center line/ gap in the roof.
- 18. Dust with a mix of powdered sugar and Aiya Culinary Matcha powder.
- 19. Set aside to allow icing to set.
- 20. Display and then enjoy afterwards!
TIPS:
SHOP THE POST
To learn more about the Matcha used in this recipe, click on one of the product links below.