Matcha Choco Tacos
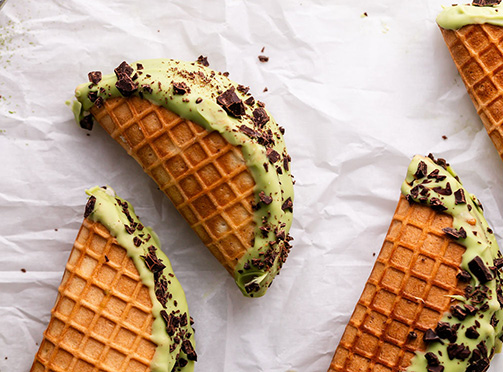
Choco Tacos with an Aiya Matcha twist. These delicious treats are filled with creamy Matcha infused ice cream encased in a crisp homemade waffle shell dipped in Matcha-infused white chocolate. A sweet fusion of flavors with an added pick-me-up for the summer season.
Matcha Choco Tacos
SERVINGS: 8+ servings
TIME: 0
CATEGORY: Desserts
 INGREDIENTS
- Homemade Waffle Shells (or store-bought)
- • Waffle Cone Maker
- • 3 egg whites
- • ⅓ cup sugar
- • ⅓ cup oil
- • 1 cup flour
- • 1 tsp vanilla
- • Pinch of salt
- Matcha Ice Cream (Vegan)
- • 2 cans organic coconut cream, shaken (13.5oz)
- • 1 can sweetened condensed coconut milk (7.4oz)
- • ½ vanilla bean seeds and pod (or 2 tsp vanilla)
- • 1 Tbsp granulated sugar or sweetener of choice
- • 2 Tbsp organic cornstarch
- • 1½ Tbsp Aiya Culinary Grade Matcha Powder
- • Ice cream machine
- • Vanilla Ice Cream (for base of cone) (store-bought or homemade)
- Matcha White Chocolate Shell
- • 12oz premium white chocolate (dairy free optional)
- • ½ tsp Aiya Culinary Grade Matcha Powder
- Additional Ingredients
- • Chopped dark chocolate or toppings of choice
 DIRECTIONS
- Homemade Waffle Shells
- 1. Place 3 egg whites in large mixing bowl. Whisk on medium for 30 seconds until frothy.
- 2. Mix in sugar until soft peaks form. Then switch to paddle attachment and mix or fold in oil, flour, vanilla and salt until smooth batter forms and all lumps have disappeared.
- 3. Heat waffle cone maker.
- 4. Use a cookie scoop to measure batter.
- 5.Pour one cookie scoop of batter onto the center of the waffle cone maker.
- 6. Press down lid and allow batter to cook for about 2-3 minutes.
- 7. Open press and remove from once golden brown.
- 8. Mold the waffle cone while it’s still hot.
- 9. Fold it in half to create the taco shell shape and place it between the slots of an upside down muffin pan until cool.
- 10. Repeat steps for all waffle cones and store waffle cones in an airtight container until ready to assemble.
- Matcha Ice Cream (Vegan)
- 1. In a saucepan, bring coconut milk, sweetened condensed coconut milk, salt and vanilla bean to a simmer to create ice cream base.
- 2. Whisk in granulated sugar and Aiya Culinary Grade Matcha powder until fully combined.
- 3. Scoop one ladle full of the simmering coconut milk mixture into heat proof Tupperware. Stir in cornstarch and top with lid. Shake the mixture until combined, then quickly whisk back into the simmering ice cream base.
- 4. Whisk the ice cream base mixture until it begins to thicken (2-3 minutes), then remove from heat and transfer to a heat proof bowl.
- 5. Chill for 1-2 hours, then transfer to the ice cream maker to churn.
- 6. Churn the Matcha ice cream base for 15 minutes until a thickened blizzard like-consistency.
- 7. Pour finished ice cream mix into a 9x9 baking dish lined with parchment.
- 8. Transfer to the freezer and freeze overnight or for at least 2 hours.
- Assembly
- 1. Remove Matcha ice cream from freezer and let it sit for 15 minutes to soften.
- 2. Spread a thin layer vanilla ice cream of choice into the bottom of each waffle shell.
- 3. Fill the remaining space in the waffle shell with homemade Matcha ice cream. Use a rubber spatula and spread it evenly to the edges of each shell, to ensure each shell is full to the brim with ice cream.
- 4. Repeat steps to fill all waffle shells.
- 5. Transfer back to the freezer for 30 minutes to set.
- 6. They are ready for dipping!
- Matcha White Chocolate
- 1. While ice cream is setting in the shells, heat white chocolate in a heat proof glass dish over a double boiler.
- 2. Stir continuously until melted.
- 3. Then mix in Aiya Culinary Grade Matcha powder until blended and a soft shade of green.
- 4. Allow Matcha white chocolate to cool slightly.
- 5. Dunk the set ice cream filled waffle shells opening side first, into the melted Matcha chocolate, fully coating the opening and edges.
- 6. Quickly sprinkle with dark chocolate or toppings of choice before the chocolate sets.
- 7. Place on parchment and repeat steps until all Matcha Choco Tacos are dipped.
- 8. Transfer back to freezer until ready to enjoy!
TIPS:
SHOP THE POST
To learn more about the Matcha used in this recipe, click on one of the product links below.