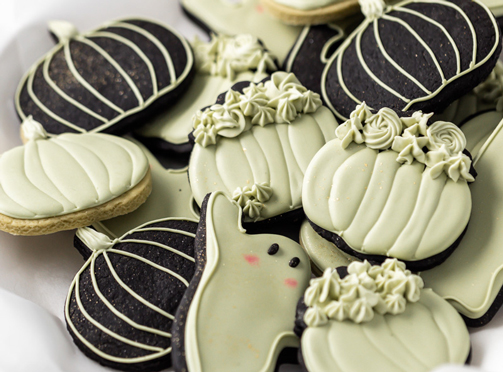
Matcha Black Cocoa Sugar Cookies

Matcha Halloween Sugar Cookies, made with dutch-processed black cocoa powder and decorated with Matcha royal icing. All naturally colored. The cookies taste similar to Oreos with a smooth and creamy Matcha finish!
Matcha Black Cocoa Sugar Cookies
SERVINGS: 2 dozen cookies
TIME: 4 hrs
CATEGORY: Desserts
 INGREDIENTS
- Matcha Black Cocoa Sugar Cookies
- • ¾ cups vegan butter (or regular butter)
- • 1 cup sugar (½ cup confectioners sugar & ½ cup granulated sugar for soft cookies)
- • 2 eggs
- • 1 tsp vanilla
- • 1 tsp Aiya Culinary Grade Matcha Powder
- • 2¼ cups flour
- • ¼ cup Dutch processed all natural black cocoa powder
- • 1 tsp baking powder
- • ½ tsp salt
- Matcha Royal Icing
- • 2 Tbsp meringue powder
- • ¼ cup warm water
- • 2 cups confectioners sugar (sifted)
- • 1 tsp Aiya Culinary Grade Matcha Powder
- • Additional warm water a few drops at time
- Supplies
- • Tipless piping bags
- • Small open star piping tips
- • Edible gold dust
- • Parchment paper
- • Seasonal cookie cutters
 DIRECTIONS
- Matcha Black Cocoa Sugar Cookies
- 1. Preheat oven to 400°F.
- 2. In a glass bowl, mix together flour, black cocoa powder, baking soda and salt until combined. Set aside.
- 3. In the bowl of a stand mixer, cream together butter and sugars until combined.
- 4. Pour eggs, vanilla extract and Matcha powder into the butter and sugar mixture.
- 5. Mix on med until fully combined.
- 6. Then pour the dry ingredients (flour, cocoa powder) into egg, sugar and butter mixture.
- 7. Mix together on medium until fully combined.
- 8. You'll know your cookie dough is ready when the bowl is clean and most of the dough sticks to the paddle.
- 9. Place a sheet of parchment paper onto a solid surface and lightly dust with flour.
- 10. Roll dough out onto the parchment and flour-dusted surface (until about ½ inch thick.)
- 11. Cut cookie dough into shapes with cutters of choice.
- 12. Remove excess dough from around the cutout cookies and transfer the cookies on the parchment paper directly to a baking sheet.
- 13. Bake for 4-5 minutes.
- 14. Cookies should be soft with a nice crumb texture – not crispy.
- 15. Place on a cooling rack.
- 16. Roll out dough onto parchment and repeat steps for remaining cookies.
- Matcha Royal Icing
- 1. In the bowl of a stand mixer, whisk meringue powder and half of ¼ cup warm water together on medium for 2-3 minutes, until thickened and well combined.
- 2. Switch to a paddle attachment and pour in the Aiya Matcha powder and confectioners sugar.
- 3. Mix on medium until well incorporated to create royal icing.
- 4. At this point the icing will be very thick. Add a few drops of the remaining warm water a few splashes at a time until the frosting is the consistency of toothpaste. This is consistency you’ll need for piping the icing onto the outside edges of the cookies.
- 5. The color of the thick icing will be a soft Matcha green. Add more or less Matcha to achieve desired icing color.
- 6. Then spoon out ¼ of the toothpaste-like piping icing to a tipless piping bag and tie or seal closed.
- 7. Add the rest of the warm water to the remaining royal icing and mix on medium until thoroughly combined. The consistency of this icing should be runny.
- 8. The thinned out icing is for flooding the cookies.
- 9. If you run a spatula through the icing it should take 5-6 seconds for any lines in the icing to disappear. That's when you know it's ready!
- 10. If the flood icing is still too thick add additional drops of water one at a time and mix in between to achieve the desired icing consistency. Note that a little bit of water goes a long way!
- 11. Transfer flood icing to a piping bag and immediately seal closed so it doesn’t dry out.
- Decorating the Cookies
- 1. Place fully cooled cookies on a piece of parchment or a clean working surface.
- 2. Snip the tip off the outline icing piping-bag.
- 3. Slowly outline the edges of each cookie with the paste like Matcha icing.
- 4. Then snip the tip off the flood icing-bag.
- 5. Squeeze the thin flood icing onto each cookie using a toothpick or scribe to spread it evenly around the surface of the cookie, until fully covered in icing.
- 6. Quickly poke away any air bubbles you find using a toothpick or scribe.
- 7. Repeat steps so all cookies are fully covered in icing.
- 8. Gently set each flooded cookie aside to dry. (Drying takes approximately 60 - 90 minutes.)
- 9. Then details can be added with thick outline icing.
- 10. Once cookies have dried, add the decorative details.
- 11. For ghosts add black eyes and outline the edges of the flooded cookie with thick icing. For pumpkins, use small star tips and thick piped icing to make rosettes.
- 12. Finish with a dusting of edible glitter, or Matcha powder.
- 13. Allow two hours to fully dry.
- 14. Enjoy!
- 15. Store completed cookies in an airtight container for up to 3 days or freeze for up to 6 months.
TIPS:
SHOP THE POST
To learn more about the Matcha used in this recipe, click on one of the product links below.
